
I though it might be interesting for you to follow the production of a piece. Since I'm working on the three large boards for Chris and Chris, let's see how that works. Since I've already finished the base glue-up for the largest board, let's follow the steps for the smaller board which will be 12" x 18" plus a 4" handle.
First, I cut 26" long pieces from the cherry board. Why 26? Well, the finished cutting board plus the handle is 18", and I add an extra 4 inches for the snipe that the planer will take. Snipe is an imperfection caused by the planer. Basically, the planer bites a little too deep in the first and last two inches of the board as it goes through the planer. Snipe is very difficult to fight, so I just add a few inches to absorb the snipe, and cut off those sacrificial two inches later.
First, I cut 26" long pieces from the cherry board. Why 26? Well, the finished cutting board plus the handle is 18", and I add an extra 4 inches for the snipe that the planer will take. Snipe is an imperfection caused by the planer. Basically, the planer bites a little too deep in the first and last two inches of the board as it goes through the planer. Snipe is very difficult to fight, so I just add a few inches to absorb the snipe, and cut off those sacrificial two inches later.

Now that I have two 26" long pieces which are 7" wide each, it's time to saw the width down to roughly three inch wide pieces. A lot of people ask why I don't simply use a very wide board instead of gluing up strips. First, really wide boards are hard to find and secondly, they are prone to curl and twist with age unless they're really thick. Bu cutting the board into 3" strips and flipping over every second piece, the wood's grain will naturally fight itself to stay straight. Why 3 inches? It just looks nice: not too wide, not too narrow.
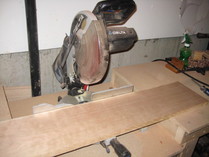
Safety first: goggles, dust mask and ear protection. Now we can cut.
Safety first: goggles, dust mask and ear protection. Now we can cut.
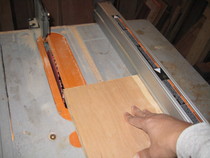
The first pass shaves off a straight edge from the rough board (photo). This edge is then placed against the saw's fence for the actual cuts to size. I set the width of the cut to about 3 1/8". The extra 1/8" will allow for corrections if required. It will also give me a finished width of 12 1/2" which again allows me a little leeway for mistakes. A well set-up table saw will give cuts so smooth they require no more preparation before glueing. Setting up the saw properly takes some time and a lot of test cuts, but it saves a lot of headaches in production. Next entry, we'll talk about the glue-up.
 RSS Feed
